


The Microsoft Power Platform provides numerous options for completing a wide range of tasks, from sending an email via Exchange Online to managing surveys in Forms and interacting with messages posted in Teams. In addition, many of the utility functions for data, date/time and text manipulation have an advanced expression syntax that supports complex operations. And if those prove insufficient, premium and third-party connectors are available at an additional cost to satisfy everything from generic RESTful web service operations to niche business activities.
Sometimes, however, requirements dictate a very specific set of operations not covered by any of the above options or which may be cost-prohibitive, difficult to configure, too complex for the target user base, and so on. In such cases, a custom connector is required that can get the job done in the exact manner required. Fortunately, both Power Automate and Power Apps share a single extensibility platform with Azure Logic Apps that allows developers to reference external API’s in a standardized format using a common design language.
Custom connectors are comprised of three main elements: 1) the connector information, 2) the connector definition (API specification), and 3) the actual API itself. Let’s take a closer look at each element and how they are implemented, then we’ll put them all together into a basic example that can easily be replicated in any tenant. A full walkthrough for creating a connector from scratch in the UI is available at https://docs.microsoft.com/en-us/connectors/custom-connectors/define-blank.
Connector Information
Interacting with an external API from within Power Platform first requires a basic description of the connector, where the endpoint resides, what protocol to use and which authentication methods are required. This information can be supplied directly in the Custom Connectors portion of the user interface (for Power Automate, this can be found under Data > Custom Connectors in the left navigation menu) or supplied as part of a definition document in JSON format that follows the OpenAPI specification (formerly known as Swagger). Regardless of which method is chosen, the following information is part of the initial definition:
- Name (or Title) – Text that will appear in the list of available connectors when adding actions to a flow or form.
- Description – A longer string of text that describes the connector and what it does.
- Gateway (UI only) – The option to connect via an on-premises gateway.
- Scheme – HTTPS or HTTP (HTTPS is preferred for obvious security reasons but not required).
- Host – The base URI stem for the target endpoint (such as “api.contoso.com”).
- Base URL – A base path that all endpoints share, such as “api” or “functions” (note that it should include the leading slash “/”).

Note that the UI allows an icon file to be uploaded for the connector along with a background color. This is optional but can help distinguish each connector in the rather lengthy list of available actions the user has to select from when designing a form or flow.
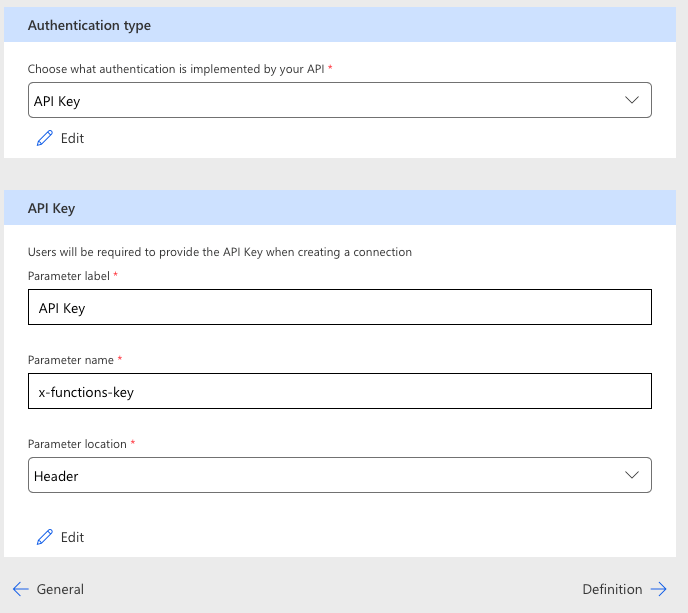
Once the basic information has been supplied, an authentication mechanism must be chosen. There are three options: No authentication (anonymous), Basic authentication, API key, and OAuth 2.0. Each API provider has their own security requirements, with some choosing to offer a completely open and free set of endpoints while others use a legacy username/password combination (Basic authentication) or a complete OAuth implementation, which requires information such as Client ID, Client Secret, Authorization URL, Token URL, Refresh URL, Scope and Redirect URL. Many have chosen to adopt the simpler and easier-to-implement API key method, in which a secret key is generated that only the API author and the consumer share. To keep things simple in this example, it is assumed that the API key method will be selected, in which case the parameter information is supplied, label and name, along with the location (typically in the request headers but this information may also be sent as part of the query string).
Connector Definition
Once the basic information has been supplied, an API specification must be provided that defines the actions, triggers, references and policies that comprise the connector. There are many different ways to define these elements and the process can be completed entirely in the UI following the visual prompts or in a text editor by constructing a JSON or YAML object following the Open API specification. Developers can predefine the entire connector in advance and upload it or edit it on the fly using the “Swagger Editor” toggle switch in the wizard.
For developers who do not wish to use the point-and-click, forms-based approach in the portal, the editor offers some distinct advantages over the UI, such as the ability to use #ref tags for reusable objects, and exposes Microsoft-specific labels such as “x-ms-summary” and “x-ms-visibility”, which are fully supported as custom elements by the underlying specification but which may not pass validation in some generic editors. Take note when crafting a definition manually that Power Platform supports the 2.0 version of the Open API specification (known as “Swagger”) whereas a newer version (3.0) exists that has a slightly different syntax and structure. An example of a complete Swagger file for a custom connector is included in the GitHub repo linked to at the end of this article under the path /Connectors/swagger.json.
Action definitions require several sets of information to be supplied, starting with the General section which encompasses basic values such as the action summary, description, and ID. It also includes the optional Visibility selection which determines how the required inputs and parameters are displayed in the action configuration panel.
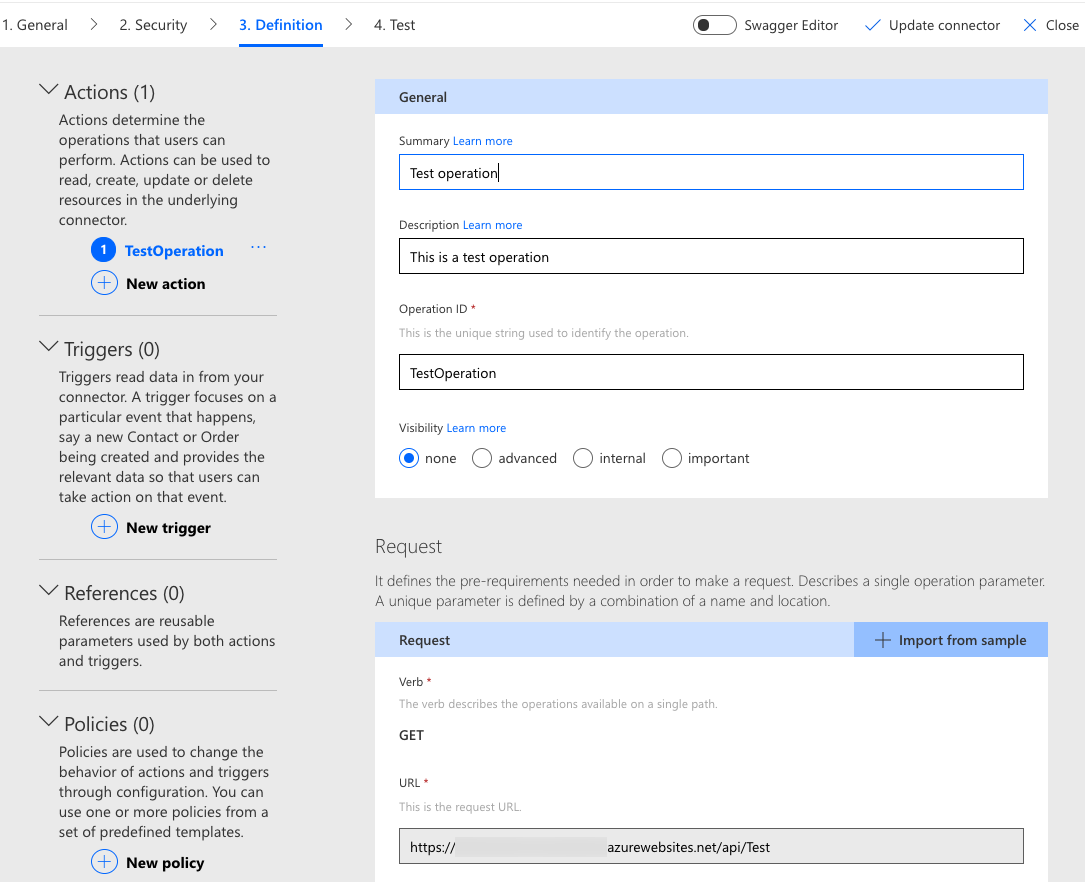
The Request section specifies the HTTP verb used to invoke the endpoint, the URL where it is located, required headers and parameters. Take note when using the “Import from sample” option that the UI is misleading in this regard, as the URL should be relative to the Host and Base URL parameters supplied earlier, including the leading slash “/”. Also, while each verb selection changes the available options, when selecting GET it is not clear that query parameters should be supplied as key/value pairs in the URL field (the other verb options are a bit more straightforward as the Body section is exposed and provides a sample text snippet) nor are the options exposed for the data type or whether or not it is required. It is helpful to switch to the Swagger Editor to see how these are actually implemented in the definition file and change them there as needed.
The same guidance applies to defining Response objects. The “Add default response” panel provides a useful start, even allowing for header and property type settings to be specified, but doesn’t encompass the full range of options, such as varying responses by HTTP status code or referencing a common set of shared schema objects. For this, use of the Swagger Editor (or a pre-defined specification document) is a must. A very basic sample definition file in YAML format for an operation entitled “TestOperation” with a single endpoint of “/Test” accepting a query parameter called “input” in an HTTP GET request and returning a string parameter named “response” would look something like the following:
swagger: '2.0'
info: {title: Test 1, description: This is only a test, version: '1.0'}
host: xxxxxxxxxxxxxxx.azurewebsites.net
basePath: /api
schemes: [https]
consumes: []
produces: []
paths:
  /Test:
    get:
      responses:
        default:
          description: default
          schema:
            type: object
            properties:
              response: {type: string, description: response, title: common}
          headers:
            Accept: {description: Accept, type: string}
      summary: Test operation
      description: This is a test operation
      operationId: TestOperation
      parameters:
      - {name: input, in: query, required: false, type: string}
definitions: {}
parameters: {}
responses: {}
securityDefinitions:
  apiKey: {type: apiKey, in: header, name: x-functions-key}
security:
- apiKey: []
tags: []
Triggers can be defined that automatically invoke the connector in response to specific events. Two types are available: Polling and Webhook. A polling trigger is a timed activity, beginning with a specific state, that calls an endpoint on a defined scheduled to retrieve data. Webhook triggers are HTTP callbacks registered with an external service that, based on a set of events exposed by the publisher, initiate a flow a Logic App activity. Much like the connector definition, both types of triggers are defined in a Swagger document that specifies the endpoints, parameters, conditions and responses. A step-by-step wizard for triggers is also available that follows the same general layout as the action wizard; however, whereas simple actions can be constructed almost entirely in the UI, triggers can be more complex depending upon the provider requirements and thus require more manual modifications. Walkthrough guides including samples for creating trigger definitions are available at https://docs.microsoft.com/en-us/connectors/custom-connectors/create-webhook-trigger and https://docs.microsoft.com/en-us/connectors/custom-connectors/create-polling-trigger.
Policy templates provide a mechanism for dynamically altering connection properties and behaviors. For example, instead of a fixed Host value, it may be desirable to set a dynamic value depending on a user selection or other variable. To facilitate this, an additional parameter could be added to the connector that is accepted by the endpoint but not actually used for any processing. Instead, a policy template expression of “@connectionParameters(‘dynamicHostUrl)” could be supplied for the URL Template value in the Set Host URL policy configuration. Within the flow, when the Test action is added, the user would map a variable to the “dynamicHostUrl” parameter, which would invoke the policy template and swap out the “host” value in the definition for the supplied variable. For more information on using policy templates, visit https://docs.microsoft.com/en-us/connectors/custom-connectors/policy-templates.
API
With the connector definition now in place the API endpoint can be invoked by the user when the corresponding action is executed by the form or flow. The manner of endpoint implementation is completely up to the developer. It can be in any language and on any technology stack. The only fixed requirements are that it accept the defined parameters on the specified endpoints, validates the authentication scheme and returns a response in the correct format.
For purposes of the Test operation example, an Azure function that returns a Base64 encoded value for the input string will serve to demonstrate the end to end functionality of the custom connector. From the Azure portal or Visual Studio, create a new Function App in the desired subscription and resource group. Take note of the function app name URI and insert this value into the Host URL setting of the connector definition (in the Swagger file, this is the “host” property in the first section). Select a storage account, OS (if configuring through the portal) and plan type (Consumption is the least expensive). Review and deploy the plan or publish from Visual Studio.
(NOTE: If you are unfamiliar with creating Azure Functions, refer to this guide for more information: https://docs.microsoft.com/en-us/azure/azure-functions/functions-create-first-azure-function)
In the function app, create a new HTTP Trigger function named “Test”. In the code editor, change the default query and body parameter to match the operation parameter specified in the Swagger definition (“input” in the above example). Then add code to convert the input string to a byte array, encode it, and return an OkObjectResult:
#r "Newtonsoft.Json"

using System.Net;
using Microsoft.AspNetCore.Mvc;
using Microsoft.Extensions.Primitives;
using Newtonsoft.Json;

public static async Task<IActionResult> Run(HttpRequest req, ILogger log)
{
    log.LogInformation("HTTP trigger function processed a request.");

    string input = req.Query["input"];

    string requestBody = await new StreamReader(req.Body).ReadToEndAsync();
    dynamic data = JsonConvert.DeserializeObject(requestBody);
    input = input ?? data.input;

    if (input != null)
    {
        var _bytes = System.Text.Encoding.UTF8.GetBytes(input);
        string response = System.Convert.ToBase64String(_bytes);
        return (ActionResult)new OkObjectResult(response);
    }
    else
        return new BadRequestObjectResult("Please pass a valid input in the query string or in the request body");
}
Note that there are two types of output: OkObjectResult and BadRequestObjectResult. These correspond to HTTP status codes 200 and 400. The example Swagger definition created previously only specifies a single response type with no distinction between responses that succeed or fail. This can be overcome by adding declarations for each response type and even extending those to return complex objects instead of simple strings. Operations can share response types using the “schema” and “$ref” syntax and there can be multiple types in a single definition file. When references are included in the underlying Swagger, the UI will automatically update the References section of the connector accordingly.
Once the function is ready, it can be tested in the portal by clicking on the Test tab and specifying a value for the “input” parameter. The Output section will show the encoded result when the Run button is pressed. Any errors will be logged to the console for troubleshooting. Before returning to the Power Automate portal, click the Manage option for the new Test function and copy the default key. Since the connector definition requires an API Key for security, this key will be needed to test end to end functionality.
(NOTE: It may be necessary to enable CORS on the function to allow calls from Flow. To do so, click on the Function App name, then select “Platform Features”. Find the CORS option then click it to open the configuration panel. Add the origin URL for the tenant region, such as https://us.flow.microsoft.com, then click “Save”).
Wrapping It Up
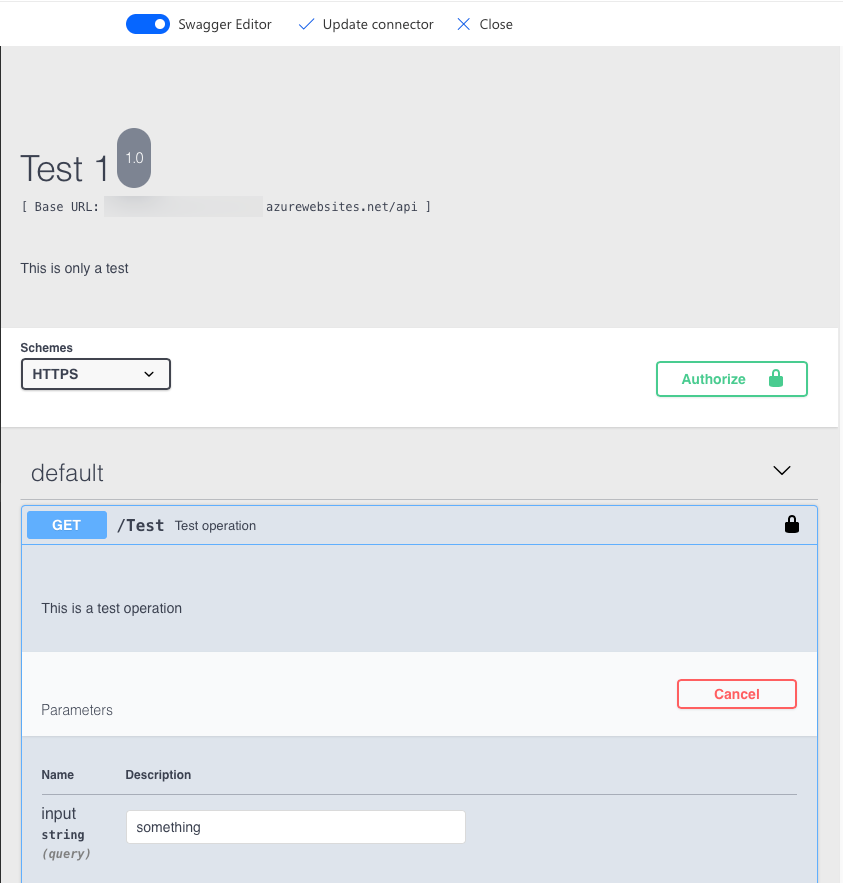
Back in the custom connector definition, insert the host URL value into the Swagger definition (assuming the above process was followed, this will be “<FuncationAppName>.azurewebsites.net”). Toggle the Swagger Editor on, then click the “Authorize” button. Paste in the default function key value from the function app settings then click “Authorize”. Close the dialog, click on the /Test operation to expand the options, then click “Try it out”. Insert a string for the “input” variable, click “Execute”, and the function will respond with a 200 code and the encoded value in the response body.
The connector can now be used as an activity within a flow or form. Create a new flow, add a manual trigger, then create a new step and navigate to the Custom section, and click the custom connector name.

Double-click the action name (“Test” in this example) to add it to the design surface. The parameter value will be displayed with an input field for manually entered text or dynamic content.

Supply some text then add an O365 Send an email action with the connector response value in the body. Save and run the flow to receive a message with the encoded value for the supplied string.

The custom connector implementation is now complete. Additional functions can be added to the same connector to expand the range of available activity options, each of which will show up in the search results when a new step is added to the flow. Be sure to give each operation a descriptive name so it will be apparent to users what the function does (the list can be quite lengthy for generic search terms so uniquely identifying functions and avoiding ambiguous naming conventions is important). As each connector is updated the new functions immediately become available for selection. Updates can be applied in the UI as previously described or a new version of the Swagger file can be uploaded to completely replace the existing definition.
Take note that modifications to existing functions will only go into effect when a flow or form is modified or a new instance of the activity added to a step – changes on the front end (API definition) will not impact currently running activities; however, changes to the back end (API endpoint) should take into account previous activities that may still be in operation. It may be necessary to deploy multiple versions of a custom connector if significant changes have been made on the front end, back end, or both (examples of this can already be seen in some of the built-in and premium connectors).
References
Custom connector overview and walkthroughs:
https://docs.microsoft.com/en-us/connectors/custom-connectors/
Custom connector OpenAPI extensibility:
https://docs.microsoft.com/en-us/connectors/custom-connectors/openapi-extensions
Custom connector connection parameters:
https://docs.microsoft.com/en-us/connectors/custom-connectors/connection-parameters
Custom connector policy templates:
https://docs.microsoft.com/en-us/connectors/custom-connectors/connection-parameters
GitHub repo for Azure function with global currency conversion endpoint and advanced sample Swagger file:
https://github.com/eshupps/Conversionator
Collaboration means two-way communication!
Did you like this article? Are you interested in this topic? Would you like to share your knowledge and experience with the authors and other readers? Our #communityrocks group on Facebook is bringing everyone involved together: authors, editors and readers. Join us in sharing knowledge, asking questions and making suggestions. We would like to hear from you!
Join us on Facebook
Related Articles

Provisioning teams in Microsoft Teams using the PnP Provisioning Engine
In this article you will learn what the potentials of the PnP Provisioning Engine are in the fields of provisioning resources in Microsoft Teams, within the context of Microsoft 365 and SharePoint Online.

Logic Apps vs. Power Automate – Simplified
In this article we are about to simplify – as much as we can – the task of when to use Power Automate and when to use Azure Logic Apps.

Microsoft 365 – Making Good Technology Decisions: Data Storage
When we build a solution within the Microsoft 365 ecosystem, we almost always need to store some content which is generated during the use of the solution. I’ve always thought about that content as falling into several different, broad brush buckets.